How to configure PuTTY for optimal connectivity to ONTAP systems
Procedure
Where to Download PuTTY
The install packages and source code can be downloaded from stable release site. It is recommended to stay up to date with PuTTY releases for fixes and to maintain connectivity with updated security requirements.
Quick Connection
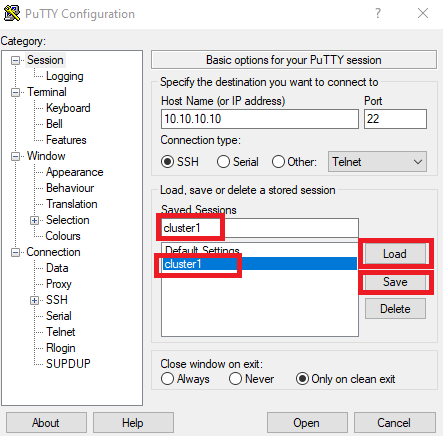
To use PuTTY for a one time SSH connection to an ONTAP cluster management LIF, node management LIF or SP/BMC, first create and save one or more generic SSH session profiles with logging configured but without any host or IP address specified. Do NOT connect to a cluster without first ensuring you are logging the session output to a file.
Next, Load the saved SSH generic session profile, enter the IP address and click Open. Note username@ is optional but can be specified at the same time as shown in the example below.

Default Settings and Saved Sessions
PuTTY is configured through a series of panels located in the Category menu on the left side of the PuTTY application. Each of these settings allows for the fine tuning of the application. When the application is first launched the Session panel is open and the only entry in Saved Sessions that appears is Default Settings. Editing the Default Settings saved session (using the other panels) will reflect in all future quick connection sessions as well as be the basis for any other saved sessions. Once a unique session is saved the configuration of that session can be altered using the panel selections and saving all the changes.
Editing the Default Settings saved session
1. Click on Default Settings under Saved Sessions.
2. Click on the Load button.
3. Make any desired changes in the panels as outlined in this article.
4. Return to the Session panel.
5. Click on the Default Settings under Saved Sessions.
6. Click on the Save button.

Creating or editing a custom saved session
1. Make any desired changes in the panels as outlined in this article.
2. Return to the Session panel.
3. To create a new saved session, enter a meaningful name in the text box and click the Save button.
4. To edit a custom saved session, select the previously saved session name, click on the Load button, make the desired changes, again select the previously saved session name, and click on the Save button.
5. Make a connection to a saved session by double-clicking on the session name, or alternately by selecting the session name, clicking the Load button, and then clicking the Open button.
Logging Session Output
Enabling logging of session output allows for ease of reference to activity that took place during a session for historical and troubleshooting purposes. Log files consume a relatively small amount of space and compress well.
1. Select the Logging category.
2. In the panel select the option for "All session output".
3. For the log file name select a directory name that already exists and use the builtin variables to save the log file with a unique and descriptive name. The variables that can be used are as follows:
&Y for year
&M for month
&D for day of the month
&T for time
&H for hostname or IP address
&P for the port number
For example, "C:\Logs\COM3_&Y&M&D.log" would produce a series of daily files, such as "COM3_20220831.log"
4. Select the radio button for "Always append to the end of it".

Don't forget to go back to Session and Save your changes to the session profile.
Configuring Scrollback
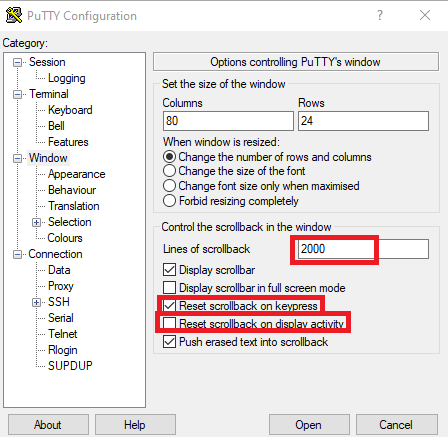
During a session with an ONTAP system there might be many lines of results produced. Configuration of scrollback can be done in the Window panel.
1. The number of lines of scrollback defaults to 2000. If more lines are necessary increase that value, for example 20000.
2. To allow scrollback to "freeze" in place while viewing scrollback, check the "Reset scrollback on keypress" and uncheck the "Reset scrollback on display activity" boxes. This will keep the focus at the location when scrolling back to view previous output and return the focus to the command line prompt when any key is pressed.
3. Review the other settings on this panel to adjust window size options.
Configuring a Window Title
In each saved session be sure to include a window title to help you manage multiple sessions.

Altering Appearance and Color
Changing the font type/size as well as the colors associated with a connection can help quickly identify visually a specific session when multiple are open. The font can be changed within the Appearance panel and the color palettes within the Colours panel.
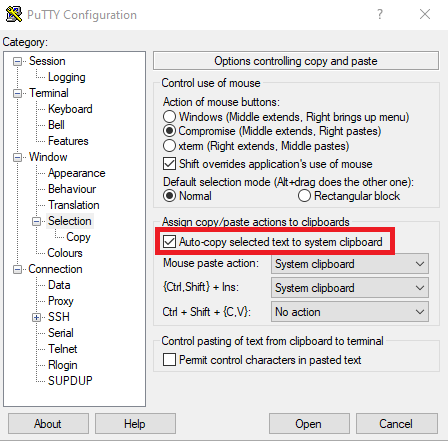
Automatic Copy of Text
PuTTY has the ability to automatically add highlighted text into the system clipboard. From the Selection panel check the "Auto-copy selected text to to system clipboard" box.
Avoiding Dropped SSH Connections
SSH connections that are idle for too long may be terminated by the remote host or by an intermediary. To help avoid this situation configure a non-zero keepalive value as shown below.

TIP: If your session has timed out - the Title Bar says "(inactive)" - instead of closing the session and starting a new one simply right-click on the Title Bar of that session window and select Restart Session. This allows you to quickly re-establish the connection and pick up where you left off in a single step.
SSH Key Exchange and Encryption Ciphers
ONTAP allows for the modification of SSH configuration key-exchange-algorithms, ciphers, and mac-algorithms. When changes are made on the ONTAP side alter the SSH panel (and subpanel) settings to match.
Server Host Key
When connecting to a SSH host for the first time, PuTTY will prompt that the server's host key is not stored in the local registry. To continue with the connection select either Accept to add the host key to the registry or Connect Once to prompt each connection for the host key acknowledgement.
Serial Connectivity
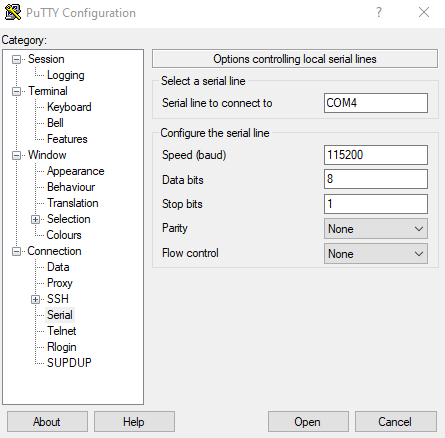
When connecting via a micro-USB console cable or RJ45 serial console cable, change the settings under the Serial panel to match the following.
- Serial line to connect to = as shown in device manager
- Speed (baud) = as described for the specific model
- Data bits = 8
- Stop bits = 1
- Parity = None
- Flow control = None
Return to the Session section and ensure that the connection type is set to Serial:

PowerShell Log Cleaner Tool
Configuring the log file as noted above, might add some unwanted characters or cause some readability issues. To cleanup the log files for easier review use the PowerShell PuTTYLogCleaner script.
Additional Information
Procedure for Apple Mac : Follow the embedded serial port manufacturer instructions for use with Mac.
Known solutions:
No Comments